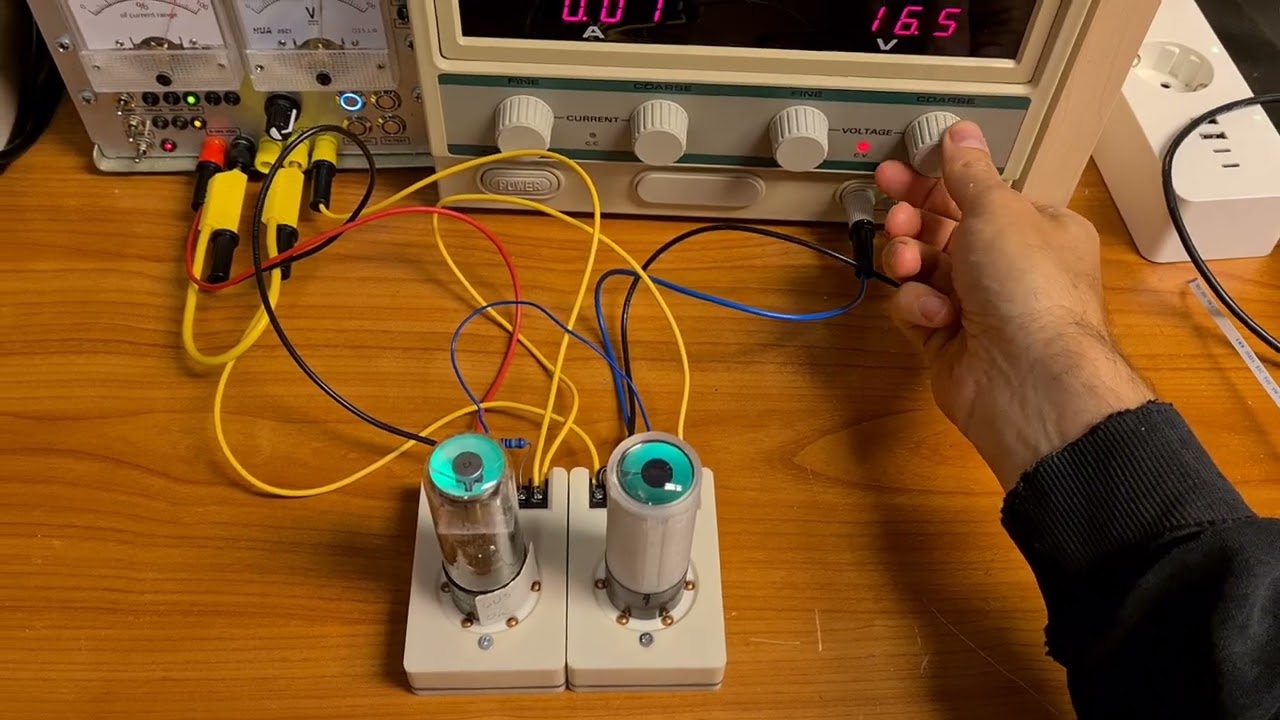
Don Pivo is single-handedly bringing back the vintage “Magic Eye” indicator tube, designing modern digital replacements in 3D-printed housing – with his latest being an LCD-powered alternative to the 6U5.
“Tuning indicator tubes have hardly been manufactured the last 50 years, and some types are scarce, e.g. the 6U5,” Don writes of his work. “When restoring a Tandberg Sølvsuper four some months ago, I was lucky to acquire a mildly used 6U5 to replace the burnt out one; for a reasonable price. For the next Sølvsuper 4 restoration, I started looking for alternatives.
“Since the introduction of smart watches, an increasing number of round displays have become available on the market, most of which are too large to fit inside the glass envelope of a tube which has an outer diameter of less than 3cm, and finding a suitable display and learning how to interface it, was probably the most challenging tasks of this project.”
“Magic Eye” tuning indicators, more properly known as electron-ran indicator tubes, are a type of vacuum tube display which makes it easy to tune into a signal by offering a visualisation of the signal strength. As with most types of vacuum tube technology, they’re fragile and no longer manufactured – which is where Don’s replacements come in, swapping classic technology for a simulation running on a microcontroller and outputting to a circular OLED or LCD panel.
Don’s 6U5 replacement runs on an STMicroelectronics STM32F microcontroller and outputs to a 0.99″ IPS circular display. An adapter board, with a half-wave rectifier, reservoir capacitor, fuse, and ferrite bead, connects the electronics to the radio – receiving AGC voltage, which changes proportionally to the signal strength and which is used to simulate the 6U5’s display.
A full write-up of the project, with links to earlier tuning indicator designs, is available on Don’s blog; the project’s source code, KiCad projects, PCB design files, schematics, and source code are available on GitHub under a personal-use licence.
Jay Doscher has designed a rig for the SDR enthusiast on the move, designed to mount multiple radio modules to a single tripod stand for easy portability while providing adequate cooling for continuous use: the SDR Solo Kit.
“I’ll be the first to admit some of my projects are a little weird – but they usually find their way to a use for some – or close enough that they can be modified for a different task,” Doscher writes. “This is a slightly whimsical project that started off from a random Hackaday comment (no, I won’t link the comment) that seemed to worry [an SDR] radio would get hot enough to melt PETG plastic. I’m doubtful they could, but as a though experiment I wondered, what about four radios?
“From there I started to sketch out a modular system where you can print a single ‘cage’ that maintains minimal contact with the radio, while also creating space for passive cooling. This breaks down with just an electric screwdriver and can easily fit in the trunk of a car for your favourite superconference, or just stow away for storage.”
The heart of the system is a modular central cage, designed to accept up to four compact USB-connected SDR dongles – and while the LimeSDR Micro range isn’t used in Doscher’s personal build, it would be possible to modify the design to accept them. Fans mounted to the base of the cage provide active cooling, while a second cage holds a powered USB hub to power the dongles and provide a one-cable connection to a host system. Everything then clamps onto a tripod or other antenna mounting platform.
More information is available on Jay’s website; paid subscribers can gain access to the STL files for 3D printing, with higher-tier subscribers receiving the Fusion 360 design files for modification.
Pseudonymous Redditor “DangerousDyke” has shared their success in receiving and decoding signals from the GOES-16 weather satellite using a low-cost antenna originally designed for Wi-Fi signals.
“[The] antenna [is a] TP-Link TL-ANT2424B with the secondary reflector extended out 2.5cm and feeding into a Nooelec SAWbird GOES LNA/band-pass filter,” DangerousDyke explains of the low-cost setup. “The only modification I did was move the secondary reflector to accommodate the longer wavelength, the feed element itself was untouched.
“I don’t want to make assumptions about the feed element’s designed wavelength but it works well enough for 1.7GHz even though the wavelength is 5cm longer (which also factors into the length I moved the secondary reflector in which I used half the difference so 2.5cm). I could have made it even better by modifying the feed element to make it properly tuned to 1.7GHz but that would likely have been replacing the element; it worked well enough for a low BER, reasonable SNR, and perfect payloads so I just let it be at that.
“Processing is done on a Raspberry Pi 5 with USB SSD running SatDump, goestools, and more, which gets synced to my NAS each night. The Pi is powered with a high current PoE [Power over Ethernet] HAT. My next step is to finish the enclosure boxes with a breather tube to bring in and circulate air from inside the house (humidity controlled and acts as a house vent).”
More information is available in DangerousDyke’s Reddit post.
Speaking of SatDump: Jamie Vital, one of the tool’s developers, has announced the availability of builds for Microsoft Windows on 64-bit Arm devices – which, he says, can perform nearly a third faster than the same software running under x86 emulation.
“These new builds run natively on Arm-based Windows PCs, like [Qualcomm’s] Snapdragon X laptops. It is about 30% faster than running the x64 program on this up-and coming line of PCs – but there’s more to the story,” Jamie explains. “To start: these builds should be considered ‘beta’ for the time being, as they have only been tested on my machine.
“Now, onto some nerdy stats. The ARM64 build is about 30% faster than running the x64 app in the emulation layer. Additionally, I tested running it in WSL2 [Windows Subsystem for Linux 2] – to great success! It looks like Microsoft has room to improve their compiler on Arm, [but] these minor improvements are in specific areas. Overall performance is greatly improved when native. There will certainly be improvement with Windows on Arm over time, but until then, enjoy the view!”
The new Arm-native SatDump is available in the project’s nightly builds at the bottom of official download page; Jamie warns, however, that it does not yet include LimeSDR support. More information is available in his Twitter thread.
The National Library of Norway is currently working on a monumental preservation project: rearchiving more than two million hours of digital radio, taking up a petabyte of disk space.
“The National Library is in the process of a major overhaul of its 2007 bit-repository, replacing it with a contemporary digital preservation system. This new solution is based on an in-house developed system called DPS (Digital Preservation Services), which uses IBM-HPSS as the underlying bit repository for data storage,” the library’s Digital Preservation Team explains. “This transition, which is expected to span over a couple of years, is necessary to ensure the long-term preservation and accessibility of the National Library’s digital collection.
“Among the materials to be re-archived are 2.2 million hours of digital radio, equivalent to 2.5 million files and a total of one petabyte of data. This includes both born-digital and digitized radio programs from the period 1993-2022. In 1993, there were four radio channels delivering 16,500 hours of radio. By 2022, the number of radio channels had increased to 30, collectively delivering 150,000 hours of radio. With the phasing out of the old bit repository, it became necessary to move this data to the new preservation solution.
“The re-archiving process resulted in 2.1 million new MP4 files, totalling 143 TB of new playback files on nb.no, replacing 40 TB of the old MP3 files. In total, 2,183,478 archive packages were re-archived in the new DPS preservation environment,” the team concludes. “This work represents a significant improvement in the National Library’s ability to preserve and make available digital radio material for future generations.”
More information is available on the Digital Preservation Team’s blog.
Semi-pseudonymous radio amateur “Chris5685,” hereafter simply “Chris,” has shared a design for a 3D-printable dual-band dipole antenna good for the 2m and 70cm bands.
“A friend asked me if I could recommend a cheapo, light external antenna for his handheld, so I came up with this instead,” Chris explains. “It’s relatively cheap, can be built with hardware store materials, and should be much better than the rubber ducky antennas that come with handheld radios. You should be able to mount it with cable ties on a 25mm pipe, or broom handle, or whatever you have at hand.
“I designed the 3D printed body, the lid, the choke coil tube, and the end plugs myself in FreeCAD, used Gembird PETG filament to print, printer is a modified Creality Ender 3 Pro. Elements are 6x1mm pure aluminium pipes, cable is RG-174, connector is SMA female for HTs. I used SDRAngel’s ‘Antenna Tools’ module for element length calculations (70cm: elements 163mm, total length 327mm, 2m: elements 491mm, total length 982mm) and stole the choke idea from a very nice tutorial.
“Elements on one side are connected, and the feed cable is connected to the 2m elements,” Chris continues. “Connections are made with crimped on 3.2mm ring terminals, and I used appropriately sized blind rivets to fix them to the elements. I filled the inside of the case with hot glue to fix and weatherproof everything, and put a lid on with super glue, plus shrink tubes on the elements. I made cutouts for cable ties for mounting the choke and the antenna itself, and the round part at the back is for a 25mm diameter pipe or whatever you have.”
The design has been uploaded to Thingiverse under the Creative Commons Attribution-NonCommercial-ShareAlike licence, and a link to the tutorial from which the choke concept was cribbed is included in the description.
YouTuber and radio ham Hayden “VK7HH” has dug deep into whether ferrite cores can make a difference to noise levels from Ethernet and other cabling — using a NanoVNA to analyse their actual impact.
“Ferrite cores are an amateur radio operator’s best friend,” Hayden explains in a recent video. “These can be used to suppress RFI [Radio-Frequency Interference], they can be used to suppress common mode currents on antenna feed lines – but how well do they actually work at the frequency that you want them to work at?
“What I’ve done here is I’ve built two test clips: this is basically a BNC here on one end and an alligator clip here on the other. I have cut off the braid of the shield of the co-ax and I’ve just soldered the centre conductor here to the alligator clip, and what this is going to do is be able to use this on a piece of wire […] which we going to connect to the [Nano]VNA via these alligator clips, and then we can put our core over this wire and see just how much RFI suppression we get.”
The results of testing showed that the ferrites do make a difference to RFI noise levels, as you’d expect — and that you can get better results by passing a wire through a toroid multiple times rather than adding multiple toroids to a single wire. “I probably did three or four turns,” Hayden explains, “and it works all across the entire HF band.”
The full video is available on Hayden’s YouTube channel, Ham Radio DX.
Finally, YouTuber Mike, of channel MIKROWAVE1, has been building a transmitter with a difference: it’s designed to blend in nicely with the height of 1930s technology.
“We could take this transmitter into the field,” Mike says of his creation, designed to go alongside an earlier build of a regenerative receiver using contemporaneous technology, “perhaps to a Civilian Conservation Corps Camp which is nearby and and reproduce a mid-30s ham radio station. I’ve selected a transmitter that was quite popular in the mid to late 30s called the Jones push-pull oscillator.
“We’re going for a couple of watts for 40m or 80m,” Mike explains, “not a high-power transmitter – something portable that can be run on battery power, that’s the goal. In the 1930s this was quite popular: there were many expeditions going to the Arctic and other places that were remote which needed portable systems, so they were using these battery tubes and of course operating the equipment in the field with battery power so you’ve got to watch your current lighting up the tubes and you got to keep your current drain down as far as possible so that your transmitter doesn’t go dead when you’re on the North Pole – that would be a bad situation
“We’ll take the whole thing to the CCC camp,” Mike says of his plans once the radio is complete. “I’ll probably be putting up an end-fed antenna, like a halfwave long wire or an inverted L – something that’s expedient, something that would have been used at the time. But that’s going to be a couple more videos before we get to the field with the setup and see if we can actually make contacts with our 1930s station.”
The project starts in this video, with more on the build in this video and this one; additional videos will be posted to Mike’s channel, MIKROWAVE1.